
Reduce downtime & installation costs with FastSeal
Previously, it was necessary to flange or braze hydraulic tubing to make ORFS connections. Now, using Parker's new patent-pending FastSeal, you'll only need a wrench and your tube. An evolution of proven connection technologies, FastSeal combines Parker's robust bite ring and innovative seal dynamics to create a quick robust flat-face tube connection for Seal-Lok ORFS fittings.
FastSeal connections are fast and easy anywhere. Follow the step-by-step FastSeal assembly instructions below, watch the video, or download the pdf. Need additional assistance? See our FastSeal Troubleshooting Tips.

FastSeal connections are fast and easy anywhere. Follow the step-by-step FastSeal assembly instructions below, watch the video, or download the pdf. Need additional assistance? See our FastSeal Troubleshooting Tips.
Step-by-Step Assembly: Prep
To start, please select your tubing OD and wall thickness using Table 1.
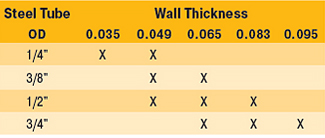
TABLE 1: Tubing OD and Wall Thickness
TABLE 1: Tubing OD and Wall Thickness
Prep your tube by cutting, deburring and cleaning it.
For proper tube end preparation see the Assembly and Installation Section Parker’s Catalog 4300 or watch our techConnect Tube End Prep Video.
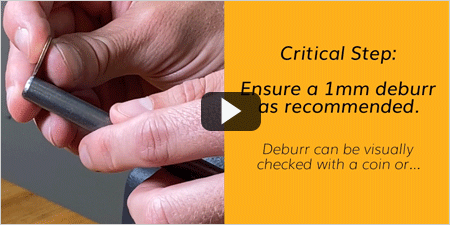
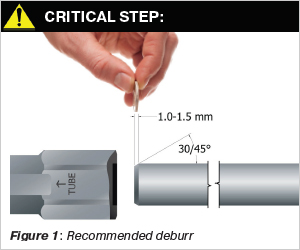
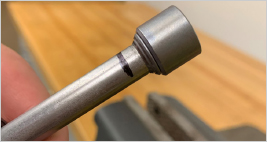
A heavy deburr, per Figure 1 of at least 1 mm on the tube is recommended to prevent damage to the internal O-ring. Ensure tube is clean and all chips and debris have been removed from the tube. The deburr dimension can be checked visually (roughly the thickness of a coin) or with the depth gauge on the back end of the marking tool.
For proper tube end preparation see the Assembly and Installation Section Parker’s Catalog 4300 or watch our techConnect Tube End Prep Video.
A heavy deburr, per Figure 1 of at least 1 mm on the tube is recommended to prevent damage to the internal O-ring. Ensure tube is clean and all chips and debris have been removed from the tube. The deburr dimension can be checked visually (roughly the thickness of a coin) or with the depth gauge on the back end of the marking tool.
Step-by-Step Assembly: Pre-Set
FastSeal connections require pre-setting that can be accomplished by hand with a wrench and is best done with the assistance of a fixed vice. Have questions? See our FastSeal Troubleshooting Tips. Have a lot of FastSeal assemblies to make? You can also use Parker's Hydra-Tool or Hyferset to preset Fastseal.

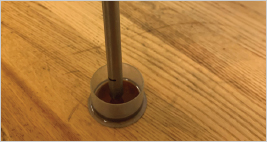
STEP 1 – Place marking tool on tube until it bottoms out. Mark around OD as shown. If marking tool is not available, use insertion depths shown in Table 2.
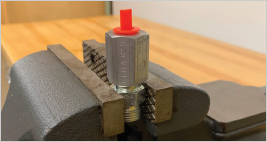
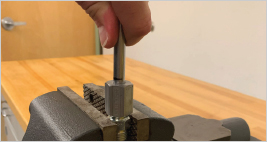
STEP 2 – Thread FastSeal nut onto fitting body or mandrel hand tight. This is best completed with the assistance of a fixed vice if available.
STEP 3 – Lubricate the end of the tube with hydraulic oil to help with insertion in the next step.
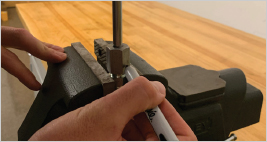
STEP 4 – Insert the tube into the FastSeal nut to the tube depth mark. Twist and push tube to aid the insertion. You will feel the tube pop past the O-ring and bottom out.
STEP 5 – Mark the nut and body as shown to assist with the FFFT preset.
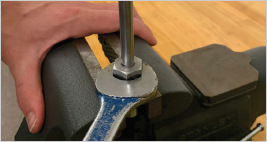
STEP 6 – Tighten the nut to specified FFFT of 7-8 flats. You should feel a perceptible torque rise around 7 flats.
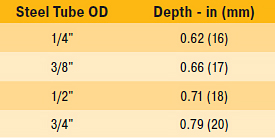
TABLE 2: Tube Insertion Depths
Step-by-Step Assembly: Inspection & Installation
PRE-SET INSPECTION
The gap closure is an important visual inspection to make after presetting the FastSeal nut. A "closed gap" can vary from 0-0.01" (0-0.25mm). This small gap may be caused by spring back of the material and will close when the parts are tightened at final assembly.
Loosen and back off nut to inspect the sleeve gap to ensure it has closed (see Figure 2).
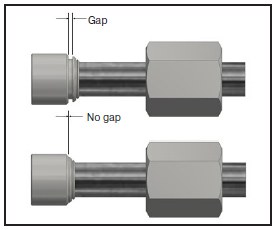
FIGURE 2: Gap closure inspection reference
INSTALLATION
Once the gap is confirmed closed, assemble tube to fitting body and torque to the values shown in Table 3.
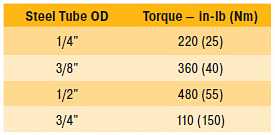
TABLE 3: Final Assembly Torque
Have questions? See our FastSeal Troubleshooting Tips.
Once the gap is confirmed closed, assemble tube to fitting body and torque to the values shown in Table 3.
TABLE 3: Final Assembly Torque
Have questions? See our FastSeal Troubleshooting Tips.
Fix Damaged Tube in the Field
FastSeal can be used as a splice to repair pinhole leaks and small sections of a damaged tube in the field. All you need are two FastSeal fittings, one Parker HLO ORFS union or WLO ORFS long union fitting, and a pair of wrenches.
Follow these quick steps:
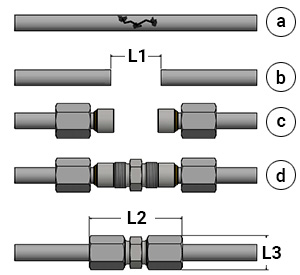
- Identify the leak point or damage on your tube (a), then measure and mark a total "L1" distance (b) given in Table 1 based on your size tubing.
- Cut your tube at the marked location to remove the leak point and deburr the two exposed tube ends.
- Install the Parker FastSeal connections on each tube end (c) according to the FastSeal installation instructions, shown above on this page.
- Insert your zero-clearance HLO or WLO ORFS union fitting (d) and tighten the FastSeal tube nuts per the Torque specs in Table 1.
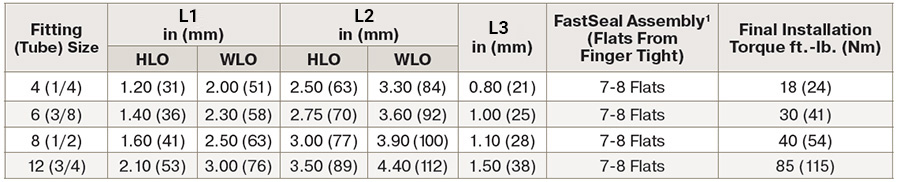
1See the FastSeal Assembly instructions shown above on this page
ASSEMBLY PROCESS
FastSeal Troubleshooting
Need additional assistance? See the tips below or contact us with any questions. We are happy to help.
UNSURE IF TUBE IS BOTTOMED
Use tube marking tool or insertion depths in Table 2 to mark tube prior to insertion and to identify if you have met appropriate depth when tube is inserted into nut.
UNABLE OR DIFFICULT TO PUSH TUBE INTO NUT
Tube may be oversized or oval. Use tube making gauge to check for correct size and ovality. If tube does not fit in gauge do not use, select another tube and use gauge to verify the size and ovality before using.
OR
Ensure nut was not tightened more than hand tight onto fitting or mandrel body before inserting tube. Do not wrench tighten nut before tube is fully inserted this may cause bite ring to begin to preset, interfering with tube insertion.
OR
Ensure nut was not tightened more than hand tight onto fitting or mandrel body before inserting tube. Do not wrench tighten nut before tube is fully inserted this may cause bite ring to begin to preset, interfering with tube insertion.
TUBE WILL NOT PUSH TO MARKED DEPTH ON TUBE
Avoid O-ring damage, DO NOT FORCE TUBE. Remove tube and ensure tube is properly deburred to at least 0.040in (1.0 mm) and is cleaned thoroughly. Inspect the tube to ensure it is round, within dimensional specs (should easily fit in tube marking gauge). Ensure a small amount of oil is applied to end of tube before inserting, use slight twist when inserting. DO NOT FORCE, DO NOT USE A HAMMER.
GAP NOT CLOSED AFTER PRESETTING
If gap of more than 0.01in (0.25mm) is detected, reassemble to last marked position, tighten nut ½ additional flat, inspect gap for closure.
LEAKS AT LOW PRESSURE
Internal O-ring may be damaged. Contact Division for assistance.
LEAKS AT HIGH PRESSURE
Inspect the ferrule and sleeve to confirm there was no gap after presetting. Ensure connection was tightened to proper Seal-Lok assembly torque per table S14 4300 catalog. Confirm Seal-Lok trap seal is not damaged or missing. Internal O-ring may be damaged. Contact Division for assistance.
TUBE MOVES IN NUT AFTER PRESETTING OR FINAL ASSEMBLY
Preset was not done correctly. DO NOT USE CONNECTION. Remake tube assembly.
TUBE PULLS OUT OF NUT AFTER PRESET
Preset was not done correctly, tube too hard. DO NOT USE CONNECTION. Check tube material, wall thickness and size. FastSeal nuts are intended for use with low carbon steel seamless or DOM tube intended for hydraulic applications (reference SAE J524/J525).
UNSURE WHAT TUBES TO USE
FastSeal nuts are intended for use with low carbon steel seamless or DOM tube intended for hydraulic applications (reference SAE J524/J525). Use of the correct tube wall is critical to meet performance criteria. Recommended tube walls can be found in Table 1.
Stay Connected
It's not just a bad pun! We mean it! Parker Hannifin is your complete source for quality tube fittings, hose & hose fittings, brass & composite fittings, quick-disconnect couplings, valves and assembly tools, locally available from a worldwide network of authorized distributors. We offer a wealth of resources to help your business. Contact us today for more information.

Live Chat
Have questions or need assistance finding something? Live chat is available most weekdays, 8am-5pm EST so you can talk to a division representative directly. We are here to help!
FOLLOW US
Follow Parker Hannifin on social media:
